.svg "GoElite Logo")
Form I-539, Explained
At a Glance
What is Form I-539?
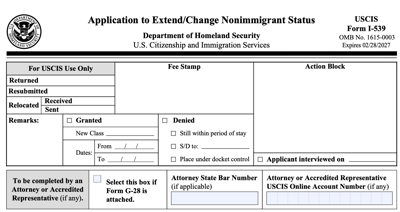
Form I-539, Application to Extend/Change Nonimmigrant Status, serves nonimmigrants seeking to either extend their stay in the United States or switch their current nonimmigrant status. This application allows those wishing to prolong their legal residence period without exiting the country.
What is Form I-539A
Form I-539A is a supplemental form to Form I-539, used when applying for a change or extension of nonimmigrant status for multiple individuals. For each additional applicant listed, a separate Form I-539A must be completed to provide the necessary information. Each form must be signed by the individual applicant or, if under 14 years of age, by their parent or legal guardian.
When Should You Use
Form I-539
Form I-539 lets you apply to extend or change your nonimmigrant visa status in the United States. If you’re looking to become a permanent resident, you should file Form I-485 instead, since Form I-539 is only for adjustments within nonimmigrant categories.
Extending Your Stay
You can use Form I-539 to request an extension of your stay in the United States. For example, if you’re a student on an F1 visa who needs more time to complete your academic program or a tourist on a B2 visa wanting to explore the country further, you’ll need to submit a Form I-539.
Additionally, if you’re a dependent on an H4 or L2 visa, you may also need to extend your stay to stay in sync with the primary visa holder’s extended work authorization. Similarly, those holding a B1 business visa might require an extension to complete ongoing projects or attend further meetings that were not initially planned.
Changing Your Status
You may need Form I-539 if you’re looking to change your nonimmigrant status while in the United States. For example if you entered the country on a B2 tourist visa but then gained admission to a university, you would use Form I-539 to switch to F1 student status to make sure your residence in the United States is legal throughout the duration of your studies.
Similarly, professionals might find themselves needing to switch from a J1 exchange visitor visa to an H1B work visa due to career advancements or new job opportunities. Likewise, a dependent of an H1B worker might want to shift from H4 to F1 to pursue studies in a Day 1 CPT program. In these cases, Form I-539 enables your transition and helps ensure compliance with visa regulations while you change life paths within the United States.
Read More About Form I-539
Who Can File Form I-539
Eligibility
Eligibility to file Form I-539 includes a specific group of nonimmigrants:
- Those who were lawfully admitted to the United States on a nonimmigrant visa.
- Those whose current status has not expired.
- Those who have not committed any crimes or violated any visa restrictions.
Applicants should check the specific requirements and restrictions that could apply based on their nonimmigrant category or personal circumstances.
Eligible Visa Types
The following represent some of the common visa types eligible to use Form I-539 to change or extend their nonimmigrant status:
H1B Visa: Allows U.S. companies to employ foreign workers in specialty occupations.
B1/B2 Visa: Permits temporary entry for business (B1) or tourism (B2). Holders can extend their stay or change status for new opportunities, such as academic studies.
F1 Visa: For international students studying at U.S. institutions. Students can extend their stay or change status to work visas after graduation.
H4 Visa: Issued to dependents of H1B holders. They may need to extend their stay or change status for educational or employment opportunities.
J1 Visa: For educational and cultural exchange programs. Holders may request extensions to complete program objectives or due to delays.
M1 Visa: For international students in vocational programs. Holders can request extensions if their studies take longer than expected.
Ineligible Visa Types
Not every nonimmigrant can use Form I-539 to request an extension or change their status. Holders of certain nonimmigrant visas–including C (transit), D (crewmember), S (witness or informant)--are not eligible to use Form I-539.
Read More About Form I-539

Step by Step Guide to Complete Form I-539
Part 1: Basic Personal Information
The first section of Form I-539 requires personal details such as your name, address, and country of birth. If applicable, you should also provide your Alien Registration Number, USCIS Online Account Number, and U.S. Social Security Number, although you may leave these blank if you don’t have them.
You will need I-94 document to complete this section. Where to find your I-94? Log in to: https://i94.cbp.dhs.gov/I94/#/recent-search to find your most recent I-94 record. However, if you have changed status or extended your stay within the U.S., the website might not have the updated I-94. Please refer to the I-94 on the most recent notice you received from USCIS, as USCIS and CBP records are not always synchronized.
.%20Leave%20blank%20if%20not%20found..jpg?width=1920&height=1080&name=Usually%20a%20number%20for%20those%20with%20an%20EAD%20card%20(see%20image).%20Leave%20blank%20if%20not%20found..jpg)
Part 2: Application Type
You must indicate the purpose of your application. If you have dependents whose visa status is linked to yours, you should include their details in your application.
.%20Leave%20blank%20if%20not%20found.%20(1).jpg?width=1920&height=1080&name=Usually%20a%20number%20for%20those%20with%20an%20EAD%20card%20(see%20image).%20Leave%20blank%20if%20not%20found.%20(1).jpg)
Part 3: Processing Information
You’ll need to specify the date you plan to leave the United States, which should fall within the maximum period allowed by your visa. If you’re including dependents, select “Yes, filed with this Form I-539” to indicate that they are included.
.%20Leave%20blank%20if%20not%20found.%20(2).jpg?width=1920&height=1080&name=Usually%20a%20number%20for%20those%20with%20an%20EAD%20card%20(see%20image).%20Leave%20blank%20if%20not%20found.%20(2).jpg)
Part 4: Additional Information
Part 4 is relatively simple and mostly involves personal information. Ensure that the passport information is for your current valid passport, not an old one. The permanent residence address should be your home country's address and should match the details on your property documents as closely as possible.
For question 14 in the lower part of Part 4, applicants must answer whether they have worked in the U.S. since their last entry or since their new status became effective (no matter working experience under H1B, CPT or OPT). Regardless of whether you select "Yes" or "No," you must clearly indicate the specific details in Part 8, Page 7, sections 3.a. and 3.d. If you select "Yes," provide detailed information about your employer, including the start and end dates of your employment, your job title, work address, weekly salary, and whether this employment was authorized by USCIS.
.%20Leave%20blank%20if%20not%20found.%20(3).jpg?width=1920&height=1080&name=Usually%20a%20number%20for%20those%20with%20an%20EAD%20card%20(see%20image).%20Leave%20blank%20if%20not%20found.%20(3).jpg)
Get Help On Your I-539?
Form I-539 Costs
Form I-539 Costs and Fees
Updated Filing Fees for Form I-539
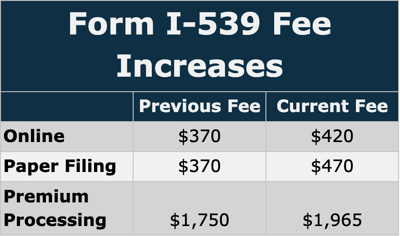
As of April 1, 2024, the USCIS has implemented new fees for filing Form I-539. The fee for online submissions is now $420, while paper filings have increased to $470. These fees apply to all submissions postmarked from April 1, 2024 onwards. In addition, applicants opting for premium processing will need to pay $1,965.
Removal of Biometrics Fee
As of October 1, 2023, the USCIS has removed the $85 biometrics services fee previously required with Form I-539. You should no longer include this fee with your application. If you mistakenly send the biometrics fee separately, the USCIS will return the payment and process your application normally. However, if you combine the biometrics fee with the application fee in a single payment, your application will be considered incorrect and thus rejected. In cases where you mistakenly authorize a credit card payment that includes the biometrics fee, the USCIS will only charge you the application fee.
Current Filing Instructions
The USCIS no longer accepts combined payments for multiple forms. This specifically affects applicants submitting Form I-539 together with Form I-765, I-824, or I-129. Additionally, a policy update from 2021 has revised the instructions for F1 students on page 4 of the Form I-539 instructions.
Form I-539 Processing Time
Form I-539 Application Timeline
USCIS advised that you should submit their Form I-539 at least 45 days before your current status expires or as soon as you realize the need to extend or change your visa status. However, 45 days is a safe choice. According to our clients experience, if you choose online filing, you will receive the USCIS receipt on the day of submission. In this case, you only need to submit the I-539 and supporting materials before your current status expires. If you choose to file by mail, it generally takes 5-10 business days to receive the USCIS receipt. Therefore, it is recommended to mail out the I-539 and supporting materials two weeks before your current status expires.
If you fail to file Form I-539 before your current status expires, this may result in rejection. However, USCIS may accept your application in certain cases. You’ll need to demonstrate that:
Failed to file the application before your status expired? Connect to an immigration attorney to discuss your case.
How Long Does It Take to Get Form I-539 Approved?
The processing time for Form I-539 can range from 3 to 8 months based on the type of status you request. Please note that these processing times can vary due to various factors, including the USCIS service center where your application is processed.
Can I Travel Abroad While Form I-539 is Pending?
No, you can't travel abroad while your I-539 application is pending vary depending on your visa type. For example, if a B1/B2 holder leaves the United States while their I-539 is pending, the USCIS will consider the application to be abandoned. Similarly, an F1 student who leaves the country during this period will be required to reapply and pay the filing fees again if they wish to proceed with the application.
Can I Stay in the US While Form I-539 is Pending?
If you apply for a visa extension or change of status before your I-94 expires, you can remain in the United States for up to 240 days while your I-539 application is processed. During this period, you must adhere to the conditions of your current visa, including any restrictions on working or studying. If your application is denied, you’ll need to leave the United States either immediately or by your I-94 expiration date.
Can I Work or Study While Form I-539 is Pending?
No, you cannot work or study while your I-539 application to change or extend your nonimmigrant status is pending with USCIS. During the time your I-539 is pending, you must continue to abide by the terms and conditions of your current nonimmigrant status.
This means that if your current status does not permit employment or study, you will not be authorized to work or attend school until your I-539 application has been approved and you have successfully changed to the new nonimmigrant status that allows for employment or study.
You can only start working or studying after USCIS has adjudicated and approved your I-539 application, and you have transitioned to the new nonimmigrant status that permits those activities. Working or studying without proper authorization while your I-539 is pending could be considered a violation of your current status and could potentially lead to adverse consequences for your immigration situation.
What Happens After Form I-539 is Approved?
You will receive the official notice of approval (Form I-797) from USCIS for your Form I-539 application. If you file I-539 online, you will receive the form I-797 both online and by mail. If you file I-539 by mail, you would only receive the paper version of I-797.
Form I-539
Supporting Documents
The required supporting documents for filing Form I-539 can vary by individual case and visa status, but they generally include proof of your current legal status, evidence of financial support, copies of passports, and any previous U.S. immigration forms:
-
Copy of passport identity page: For yourself and each dependent, include the photo ID page of the passport.
-
Copy of latest I-94 record: For yourself and each dependent, include the most recent I-94 record showing entry and status in the United States.
-
Copy of latest nonimmigrant visa: Include a copy of the latest nonimmigrant visa from your and your dependents’ passports, if applicable.
-
Copy of approval notices: If applicable, include copies of any H4, L2, O3, or TD approval notices.
-
Proof of employment: Provide proof of your employment, such as your two most recent earnings statements or an employment verification letter from your employer.
-
Proof of relationship: Include documents showing your legal relationship to each dependent, such as a marriage certificate for your spouse and birth certificates for your children. Remember to include a certified translation if needed.
-
Documents for dependents’ change of status: If a dependent is changing from a work-authorized status (such as H1B, L1, or O1), include copies of any I-797 approval notices and recent earnings statements.
-
Explanation Letter: An explanation letter is a document that must be included with the I-539 application for a change or extension of nonimmigrant status. In this letter, the applicant is required to present a compelling and well-reasoned justification for their request to change their current nonimmigrant status after arriving in the United States.The purpose of the explanation letter is to provide convincing reasons and explanations for the desired change in status, as it will be carefully scrutinized by U.S. Citizenship and Immigration Services (USCIS) officers during the adjudication process.A well-crafted explanation letter can significantly enhance the chances of approval for the I-539 application by offering a strong and credible rationale for the applicant's decision to change their nonimmigrant status. Check out our guidance on how to write a explanation letter on your own
I-94 document
Explanation Letter for Change of Status
Return flight ticket reservation (recommended)
Proof of property ownership in home country (recommended)
Change to B1: Employment verification letter from employer in home country, admission letter from U.S. school (recommended)
Change to B2: Detailed study plan in the U.S. (recommended)
I-94 document
Admission letter from school
I-20 form
Proof of funds (amount to cover first year's tuition and living costs)
Explanation letter (recommended)
Proof of property ownership in home country (recommended)
Filing Online vs. By Mail
Can You File Form I-539 Online?
There are two ways to file Form I-539 for a change of status application - one is through online submission, and the other is the traditional paper mail method. Currently, except for cases where H1B visa holders change to other statuses (such as changing from H-1B to F-1 student status or B-2 visitor status, which require paper mail submission due to ongoing disputes regarding online filing), other cases that require filing Form I-539 for a change of status can generally be completed through online electronic document submission.
Pros and Cons of Online Filing and Paper Mail
2. Not restricted by visa type; all I-539 applications can be submitted by mail.
2. Easy to submit and add documents by uploading online.
2. Risk of lost mails.
What If I Get a Request for Evidence (RFE) For Form I-539 Application
Common Reasons for Getting RFEs
"RFE" stands for "Request for Evidence." After submitting your application, USCIS may issue an RFE if the provided information is insufficient or unclear. This request asks applicants to submit additional evidence, information, or documents to support their application. Receiving an RFE does not mean denial; properly responding with all requested materials still offers a high chance of approval. Based on the cases of our clients, we will now deep dive into the six major reasons for Form I-539 denials.
Reason One: Violate the 90-Day Rule
What is the 90-Day Rule?
Some people change their intent after entering the United States. For instance, someone might enter on a B visa intending to tour but then decide to stay for education after seeing the quality of the American education system. It's normal for people to change their plans, so changing your intent after entering doesn't automatically prove you lied about your purpose when applying for the visa or at entry. However, USCIS is strict about matching your entry intent with the visa type you hold, which is why the 90-day rule was established. This rule serves as a timeframe to help USCIS officials better assess whether applicants were honest about their intentions when they entered the U.S.
Official Explanation:
"Nonimmigrant visa holders should avoid engaging in activities inconsistent with their stated entry purpose or submitting a status change application within 90 days of entry."
Important Timing for Status Change:
- Within 30 days of entry: Submitting a status change application within 30 days is likely to be seen as evidence of initial misrepresentation of intent, and the application may be denied.
- 30-60 days of entry: This is a gray area; the application may be denied, but with a reasonable explanation, approval is possible.
- After 90 days of entry: Applications submitted after 90 days are generally not seen as evidence of misrepresentation, and the success rate is high.
Specific Details on the 90-Day Rule:
For more specific details, refer to the FAM guidelines.
Exemptions:
Some nonimmigrant visa types with dual intent, such as O-1, H-1B, or L-1, are not subject to this rule. It's recommended to consult with an immigration lawyer to understand if your visa type is affected.
Case Study - Client A
Client A planned a trip to the U.S. with meticulous detail, even booking flights and hotels before the visa interview. His clear intent to tour the U.S. was not questioned by the visa officer, and he was quickly granted a B visa and successfully entered the U.S.
During his stay, Client A reconnected with a high school friend who had been studying in the U.S. The friend showed him around and shared his experiences, which inspired Client A to pursue a U.S. degree. Client A promptly applied to a US university and was accepted. Understanding that he couldn't study on a B visa, he began the status change process. However, shortly after submitting his application, he received a Request for Evidence (RFE) from USCIS, asking for the date he first contacted the school.
With the help of our lawyer, Client A wrote an explanation letter. He admitted contacting the school within 90 days but emphasized his initial intention was genuinely tourism. He provided evidence of his travel plans and hotel bookings and explained why he chose to enroll immediately instead of returning to China for an F-1 visa. His thorough response led to a successful status change from tourist to student.
Reason Two: Illegal Work Records
What Constitutes Illegal Work?
Engaging in any work without proper authorization, whether paid or unpaid, constitutes illegal work. If there is a record of illegal work, it significantly lowers the chances of a successful status change.
Typical Scenarios:
- No SSN or Payroll Records: If no SSN or payroll records exist, the work may go unnoticed.
- SSN Provided, No Pay Exceeding $600: You may need to write an explanation letter but generally don't need to worry much.
- SSN Provided, Pay Exceeding $600: This is more problematic. You may need to consider negotiating with the employer to delete the records in exchange for returning the pay or provide detailed explanations.
For more details, see the Cornell Law page.
Case Study - Client B
Client B applied for CPT but mistakenly started working before receiving proper authorization. He discovered the oversight months later and honestly disclosed his situation to his employer, who refused to correct the records. Post-graduation, Client B sought to change his status from F-1 to B visa. Our lawyer helped him craft a detailed explanation, including communication records with the school and the employer. Despite the illegal work, his status change was approved without an RFE.
Reason Three: Failure to Maintain Valid Status
Maintaining Valid Status:
USCIS requires maintaining your current status until the new status is granted. Ideally, the previous status should be maintained until the new one is in effect. If not, the period between the expiration of the old status and the approval of the new status will be considered "Out of Status," potentially affecting future immigration applications.
Specific Rules for Different Applications:
For example, transitioning to an M-1 visa requires maintaining status until 30 days before the program start date. If the previous status expires before this, a status extension or temporary change to another status is needed.
Case Study - Client C
Client C, an H1-B holder, lost his job and sought to change to F-1 status. Delays in receiving a school acceptance led to a lapse in his H1-B status. With help from our lawyer, he provided evidence of timely communication with the school and mitigating circumstances, including health issues, to justify the delay. His application was eventually approved.
Reason Four: Immigration Intent
Determining Nonimmigrant Intent:
USCIS may reject applications if they suspect the intent is to stay permanently without reasonable cause for continuing to stay. The I-539 form includes questions about past I-485 applications, which can trigger additional scrutiny.
Case Study - Client D
Client D, an H1-B holder, applied for F-1 status after losing his job. Although he had previously filed an I-140, he did not disclose this during his status change application. With our attorney help, USCIS approved his application without requesting additional evidence.
Reason Five: Insufficient Financial Resources
Proving Financial Capability:
Applicants, especially those seeking F-1 status, must prove they have enough funds for tuition and living expenses. Assets like stocks and real estate can be included, and young applicants may use family funds as proof.
Reason Six: Criminal Record
Impact of Criminal Records:
Applicants must disclose any arrests or convictions, including detailed explanations and evidence of subsequent changes. Experienced immigration lawyers can help highlight mitigating factors to persuade USCIS officials.

How to Respond to RFE
Upon receiving an RFE, applicants must reply within the specified timeframe (usually mentioned in the RFE notice) and provide the additional materials requested by USCIS. Failure to respond timely or adequately could lead to application denial. If your case is complicated and urgent, having reliable legal assistance throughout the application is crucial.
What If
My Form I-539 Is Denied?
Common Reasons of Form I-539 Application Denials
Change of Status applications generally have a high success rate. However, common reasons for denials include:
- Travel while application is pending: Leaving the U.S. can be seen as abandoning your application. While you can submit an explanation letter, it doesn't guarantee your application won't be canceled by USCIS.
- Ineligible visa categories: Some visa categories, such as C, D, K, S visas, and certain J-1 visas (subject to the 212(e) home residency requirement), do not allow for a change of status.
- Expired status: If your current status expires before approval, your application is likely to be denied. This includes the end of the H-1B grace period or the expiration of L-1 visas.
- Not meeting requirements: Insufficient documentation, such as financial evidence for F-1 visas or untimely SEVIS fee payment, can lead to denial.
- Incomplete/incorrect forms: Errors or missing information on the I-539 form can result in rejection.
- Suspicion of immigrant intent: Applications may be denied if officials believe you intend to immigrate permanently.
- Inconsistent documents: Contradictions between your application and supporting documents can raise suspicions of fraud.
What to Do If My Form I-539 is Denied
If your Form I-539 application is denied, you have several options to consider, depending on your specific circumstances.
Reapply After Denial
If your Form I-539 was denied due to a technical error on your part, you may correct the mistake and submit a new application for the same or a different nonimmigrant status.
Appeal the Decision
If you believe the USCIS denied your application in error, you may be able to appeal the decision. Not all application types are eligible for appeals, so make sure you confirm that this option is available for your specific situation.
Motion to Reopen to Reconsider
If new evidence emerges or if the original decision failed to consider all relevant evidence, you may file a motion to reopen or reconsider your case. This provides you with an opportunity to present new information that could change the outcome.
#faqs
Frequently Asked Questions
Have Question? We are here to help
How soon should I file Form I-539 before my current status expires?
To ensure timely processing, it's advisable to submit Form I-539 at least 45 days before your current status expires. However, as long as you receive the confirmation receipt from USCIS by your expiration date, you can stay in the US legally.
Can Form I-539 be used to apply for permanent residency?
No, Form I-539 is for nonimmigrant status adjustments only. For permanent residency, you must use Form I-485.
What are the current filing fees for Form I-539?
As of April 1, 2024, the fee for online submissions is $420, paper filings are $470, and premium processing is $1,965.
What happens if I travel while my I-539 application is pending?
Depending on your visa type, traveling outside of the United States while your application is pending may lead to abandonment, requiring reapplication and fee repayment upon your return.
What happens if I travel outside US after my I-539 application is approved?
Approval of Form I-539 solely allows you to change your immigration status within the United States. However, it does not grant you a new entry visa. If your I-539 application results in a change of status, you will be required to acquire a new visa corresponding to your updated status the next time you plan to travel internationally and re-enter the United States after departing.
What is Form I-539A? Who needs to use it?
When applying for multiple individuals on one I-539 application, Form I-539A is required for each additional applicant and must include that applicant’s signature.
What are the most common errors when filing I-539?
Common errors include mismatched names, unclear explanations for extension requests, inadequate financial proof, improper document submission. Additionally, applications related to student visas should be accompanied by an I-20 signed by your school’s DSO.
Read our immigration attorney's blog on "7 Common Mistakes When Filing a Change of Status Yourself".
What if I realize I made a written error or typo after submitting Form I-539?
If you realize you made an error or typo, you can submit a Typographic Error service request to correct the necessary details. Contact the USCIS or use your online account to submit this request.
Is it better to file Form I-539 online or by paper mail?
Filing your I-539 online speeds up processing times, guarantees that you’re using the correct version of the form, and allows for more direct communication with the USCIS. However, you can only use online filing if you have no co-applicants and will not require legal representation during the process.
Should I hire an immigration attorney when filing Form I-539?
Hiring an attorney to file an I-539 application is not necessary. However, if your situation is complex, or if you are facing tight deadlines, retaining an immigration attorney can help ensure the process goes smoothly. Connect with an immigration attorney here.
Need a budget-friendly alternative to attorney fees? Our visa experts can help you complete your I-539 form affordably. Contact us now!
How can I track the processing of my I-539 application?
The fastest way to check your Form I-539 application is through the case status tracker or myUSCIS account on USCIS.gov. Enter your receipt number to receive updates, omitting dashes by including other special characters.
What happens if I submit my I-539 after my I-94 expires?
From our experience, submitting your I-539 after your I-94 expiration date may result in rejection. However, you may be excused if you can show that:
- The delay was due to extraordinary circumstances beyond your control.
- The delay was reasonable.
- You have not violated your status.
- You are still a bona fide nonimmigrant.
- You are not in removal proceedings.
Connect with an immigration attorney to discuss your case.